Today Gary sets off on a build of many parts. The new FineMolds 72nd scale F-14D Tomcat kit is being delivered to model makers in a peculiar way. The kit comes in four different parts via a package with the Japanese model magazine “Model Graphix.” We will look at each of these magazine parts that supplement the model sprues that come along with it. Today part 2 of the kit with – Model Graphix 8 & sprues C, D & E.
Review: Model Graphix July 2015 Magazine Kit & FineMolds 1/72 F-14D Tomcat vol.1
by Model Graphix
152 pages.
Code: MDGMAG1507
Price: ¥2,130/ USD $17.17/ €15.72
Available from Hobby Link Japan
by Model Graphix
152 pages.
Code: MDGMAG1507
Price: ¥2,130/ USD $17.17/ €15.72
Available from Hobby Link Japan
Other parts of this review series:
Part 1 Modelgraphix & F-14 (engine nose & cockpit)
Part 2 Modelgraphix & F-14 (Fuselage)
Part 3 SA Magazine & F-14 (stores + Modelkasten Pilots)
Part 4 Modelgraphix & F-14 (Wings & Stores)
Part 1 Modelgraphix & F-14 (engine nose & cockpit)
Part 2 Modelgraphix & F-14 (Fuselage)
Part 3 SA Magazine & F-14 (stores + Modelkasten Pilots)
Part 4 Modelgraphix & F-14 (Wings & Stores)
Part 5 Gary’s finished build gallery of Finemolds 72nd scale Tomcat
Part I of the build of this kit
Part II of the build of this kit
Part III of the build of this kit
Part IV of the build of this kit
Part V of the build of this kit
Part II of the build of this kit
Part III of the build of this kit
Part IV of the build of this kit
Part V of the build of this kit
If you missed our review of the Part 1 of this release I suggest you take the time to read it here and them come back and join us for Part 2.
As a reminder the new FineMolds F-14D kit has been split across three issues of the Model Graphix magazine and at the time of writing the first two parts are out (July & August) with the third and final installment due in September. A complementary F-14 weapons sprue designed for this kit has been included in the July (7) issue of SA Scale Aviation magazine which we will look at separately here on TMN as well.
So let’s get down to business. In this second review I’m going to take a detailed look at what we get with the August (08) 2015 issue of ModelGraphix.
Just like part 1, this latest installment is shipped with the magazine in a thin sturdy cardboard box that contains 2 sprues. The kit has been broken down and supplied in such a way to allow builders to work on each sub assembly while waiting for the next installment.
Once again the sprues are carefully packaged in their own bags for protection in transit.
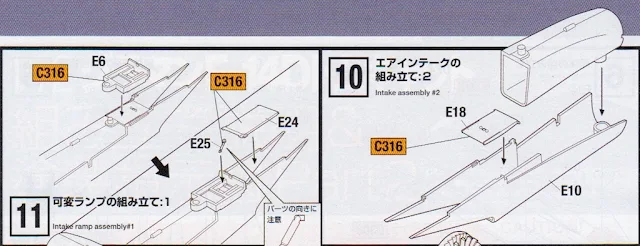
The assembly instructions are provided as pages in the magazine itself (in English too). This second installment contains the sprues that have parts for the rear fuselage, intakes and engines. The only parts that are now missing (which will presumably be supplied in part 3) are the wings, tails (vertical and horizontal) and clear parts.
Assembly in Part 2 begins with the engine blast tubes and I’d suggest that these would best be painted prior to joining. If you are careful you can normally successfully glue these type of painted parts together without damaging the painted interior.
In fairly quick order we are onto joining the top and bottom of the rear fuselage. The ‘beaver tail’ parts are also added here and I’d probably choose to leave the arrestor hook off for now. The intake trunking is next and I will most likely glue and sand this before painting. White areas like the intakes are a) more visible than engines exhaust tubes and b) larger inside so as to allow easier access for sanding & filling of the join seams.
With the work on both intakes complete its time to attach these to the lower fuselage. I normally prefer to leave the exhaust nozzles off till last if at all possible and it looks like this kit will allow just that.
The final assembly steps for Part 2 involves the optional open airbrakes, top and bottom.
So what does the plastic look like? Sprue D contains the largest single piece mouldings of the kit. The F-14 (like most modern military jets) is a complex airframe and as a result model manufacturers have to necessarily engineer their kits in such a way so as to find the right blend of buildability, accuracy and flexibility (to allow the possible future release of other variants). On this sprue we find parts for the main fuselage, spine (open or closed), ventral fins, arrestor hook and the ‘beaver tail’ with airbrakes.
The surface detail on the larger parts is extremely nice and FineMolds have designed the kit so as to minimize the amount of it that will need to be damaged during normal assembly.
A closer look at the fuselage top reveals just how sharp the panel and rivet detail is. I could see no visible flash on any of the parts and the sprue attachment points are small and thoughtfully placed.
For those modellers that want to go all-out, FineMolds have provided optional open or closed spine parts. The cabling and piping in the open spine is beautiful and will take a steady hand to paint it properly. If you don’t like your models to be opened up then an alternative closed part is provided.
Here’s what the real thing looks like with the covers off. Are you up for the challenge?
The F-14 family (A thru D) has seen a large number of variations to the airframe over the Tomcats life. The rear fuselage end or ‘beaver tail’ varied quite a bit with at least four variations. Our kit is a D model and therefore has the final configuration, which included the installation of the AN/ALR67 Mid/High Band ECM Antenna next to the fuel dump.
Another distinctive feature of the F-14 beaver tail is the airbrakes. These consist of a single piece on the top and two separate pieces below. These speedbrakes are actuated by hydraulic rams and their interior is painted safety red like all potentially dangerous parts of US Naval aircraft. This photo also affords us a good end on shot of the ECM antenna and fuel dump.
Like most aircraft the underside of the F-14 is covered in access panels affording maintenance crew easy access to the aircraft systems as needed. FineMolds has done a good job of reproducing these here on the models surface.
If you intend to attach any weapons to your F-14 then now is the time to drill out the holes to accommodate the pylons later on. We will examine the optional weapon sprue in a future article.
Running down the centre line of the belly of the F-14 is a cylindrical well designed to carry two AIM-7 Sparrow missiles. Note the rectangular slots in the well which are designed to accommodate the fins of the Sparrow. These small details show that FineMolds have really done their homework.
FineMolds have filled this model with loads of super detail. The main wheel wells have ribbing, cabling and piping which is more than adequate for a 1/72 model and will provide a good starting point for those that wish to super detail this area.
This photo (which was taken by me in 2001 onboard USS Kittyhawk) shows the main gear wells of an F-14A and is pretty typical of all F-14 versions.
Sprue E mostly contains parts for the GE F110 engine interiors and corresponding air intake trunks. Main landing gear, wheels, hubs and doors round out the rest of the sprue
The characteristic squared intake housing which blends gradually into the circular engine nacelle have been faithfully reproduced by FineMolds. This has always been a challenge to get right for model manufacturers and I’ll be interested to see how this fits together as I build the model.
Like many supersonic jet powered aircraft, variable geometry intake ramps are employed on the F-14 to control the airflow to the engine face at supersonic speeds. Another key feature is the overspill outlet that allows excess air to bleed away from the engine divert out the top of the intake.
Assembly and installation of the ramp and intake trunking looks to be pretty straightforward on this kit. I’ll be looking at this way more closely in my build article.
The F-14’s main landing gear is very beefy. This is common on carrier based aircraft to allow them to absorb huge landing impacts as the F-14 ‘flys’ into the deck when landing. The kit landing gear is very nicely detailed and if you are so inclined may benefit only from the addition of some hydraulic piping.
As a testament to the attention to details by FineMolds in this kit, just take a look at the surface rivets and fasteners that are provided on the interior of the gear doors. With a light oil wash this will stand out nicely I think.
Some very small ejection pin marks are visible here but should not prove too troublesome.
So that covers the plastic provided in Part 2 of the new FineMolds F-14D kit which comes co-bundled with the August 08 issue of Model Graphix magazine.
As mentioned before, the magazine is written in Japanese but it is also full of interesting builds and reviews of all manner of scale modelling subjects. A couple that caught our eye was this lovely Star War Scout Trooper and Speeder Bike and being an ‘aircraft guy’ I had to stop and check out the build of the new Revell 1/72 Gripen.
Thanks again to HLJ for providing us with the kit/magazine combo and stay tuned for my part 3 review where we’ll get up close and personal with the F-14 weapons and some new 1/72 Modelkasten F-14 aircrew figures.
Gary Wickham
Other parts of this review series:
Part 1 Modelgraphix & F-14 (engine nose & cockpit)
Part 2 Modelgraphix & F-14 (Fuselage)
Part 3 SA Magazine & F-14 (stores + Modelkasten Pilots)
Part 4 Modelgraphix & F-14 (Wings & Stores)
Part 1 Modelgraphix & F-14 (engine nose & cockpit)
Part 2 Modelgraphix & F-14 (Fuselage)
Part 3 SA Magazine & F-14 (stores + Modelkasten Pilots)
Part 4 Modelgraphix & F-14 (Wings & Stores)
Part 5 Gary’s finished build gallery of Finemolds 72nd scale Tomcat
Thanks to Hobby Link Japan for sending us the magazine/ model kit combo – look for the other parts of this magazine very soon and then a full build of this exciting looking little kit…
check out some of Gary's builds on his website -Scalespot .


