Clayton got straight into the build of his new Mk.I0 Chieftain
as soon as he finished his review he posted here on TMN – Today as Pt.II of his
trip he sees if his original thoughts about the kit come true in his step by step build of the kit before painting..
BUILD REVIEW
Takom’s Chieftain MK
10
Product number: #2028
1/35th scale
Plastic kit with Photo Etched detail & clear parts
included
7 markings included
Movable gun & hatches
Individual track links included
Price: ¥7,470/ USD
$62.25/ €55.45 from HobbyLink Japan
More info on this kit at Takom’s Webpage
More info on this kit at Takom’s Webpage
Since its introduction into service in 1966, the Chieftain
was long regarded as NATO’s heavy hitter. Throughout its service life, the tank
saw many upgrades. Improved ammunition, fire control systems, new radios and
numerous upgrades to the flawed L60 engine. One upgrade that was over looked
for a long time was the armour.
It was long thought that the Chieftains’ armour was strong
enough to stand up to anything the Russians could throw at it, but that line of
thinking was reassessed in the early 80’s after information gathered from the
fighting between Iran and Iraq. It was found the T-72 could penetrate the
frontal armour of the Chieftain at 1km.
An armour upgrade was soon undertaken. The Stillbrew Armour
Pack was fitted to just about every Chieftain in service. The new armour
consisted of additional armour to the frontal arc of the turret and included
extra blocks each side of the drivers’ position to protect the turret ring. The new armour completely changed the
Chieftain’s profile, giving it a sleeker and more modern look. Any Chieftain that received this armour
upgrade was then to be known as the Mk.10.
All regiments of the Armoured Corps of the British Army used
the Mk.10. The Mk.10 was later phased out by the Mk.11 and the Challenger 1.
That said, a small number of Mk.10’s remained in service with the Berlin
Brigade right up until the end of the Cold War. This was mainly as the Mk.10
was considered to be old technology and it was felt that if the Soviets were to
attack, the Berlin Brigade would have been easily overwhelmed and any new
technology would have been lost to the enemy.
On to the build.
I will call this a partial build review rather than a full
one, as there will be a lot of parts I will be leaving off until the bulk of
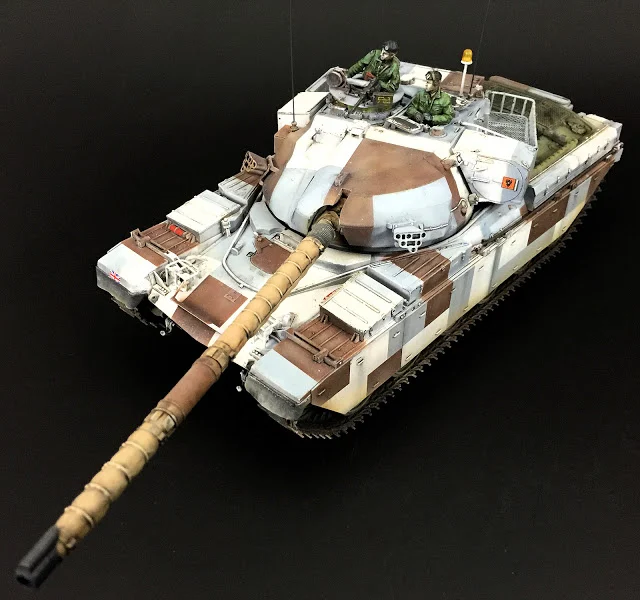
the painting is done. I have chosen to paint my tank in the urban camouflage
scheme of the Berlin Brigade. Because of the clean, straight lines of the
scheme, the masking will be easier and give a better result building the tank
in this manner.
STEP 1 sees the
construction of the wheels and running gear. Very simple and straight forward
construction.
A couple of points to note however –
Step 1 calls for part ‘K’. I couldn’t find part ‘K’
anywhere….until it came time to assemble the turret. Part ‘K’ is moulded in
with the bottom section of the turret. A trap for young players.
Also, in step 1C (the main drive wheel), I believe there
should be a couple of poly caps supplied for these wheels in the kit. I made
the mistake of fitting the 2 x poly caps supplied in the kit in these wheels
thinking Takom had made an error in the instructions. The polycap in the drive wheel made sense as
it would allow a clean, tight fit on the shaft but still allow rotation in
order to fit the track on properly.
Turns out the supplied poly caps were later required for the gun
assembly.
Other than that, the suspension was a clean and
uncomplicated fit and build. There is however no room for movement if you
wanted to pose your model on uneven terrain – it’s flat or nothing.
SETP 2 sees the
running gear being applied to the underside of the tank. Very straight forward.
Track assembly will scare a few people off I am guessing,
but really, it is quite straight forward.
The links are not the clickable / working style of track and will need
to be glued in place. Work in small sections and just drop a small amount of
glue on the joints. After about 10-15
minutes you can bend and manipulate the track around the wheels. I have left my
track broken so it can be removed for painting.
The small rubber pads
are applied to the tracks individually.
Just bear in mind when making the tracks, that once the side
skirts are attached you can’t see any of the top part of the track, so if you
were wanting to pick up the pace, you could just construct the bottom half of
the track.
Just be patient with the tracks. They may take an hour or
two to get them together, but they do look very good when complete.
Step 3. Removing
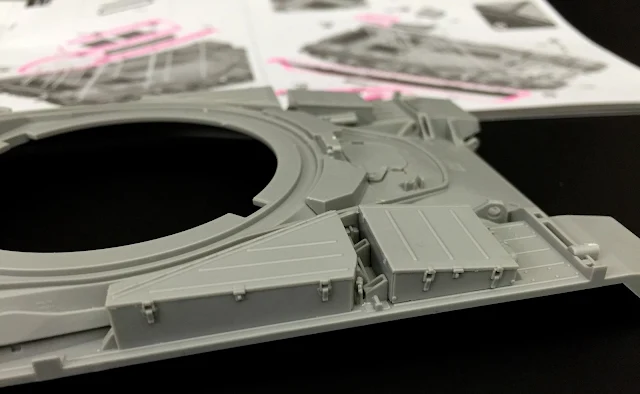
some of the moulded parts on the top side of the tank. This is where some of
the armour of the Stillbrew upgrade will sit.
Don’t be too worried about the mess you leave, the armour will cover it
up. The holes are also required during this stage.
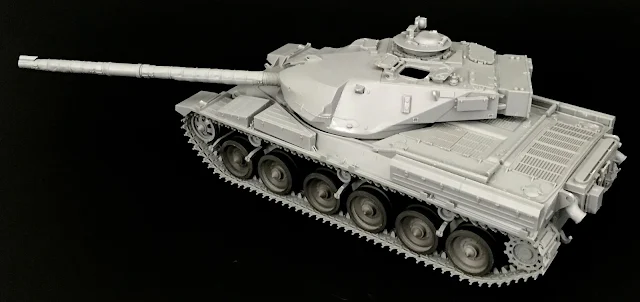
It is also shown to attach the top and the bottom parts of
the tank here, however this will be done after the wheels and tracks are
painted.
Step 4 to 6 - The
tail section and exhaust. Clean and simple but some lovely detail is present. A
small amount of filler will be required on the pipes, but other than that
everything is looking good. Again,
these parts will be painted separately and attached after the paint scheme has
been defined.
STEP 7 – Detail
parts on the front of the tank. The grills over the lights came together nicely
and will be a nice bit of detail on the finished model.
STEP 8 – the
drivers’ hatch and armour are fitted here. A small piece of photo etch is to be
set in place, but again, this will wait until after the paint.
The moulded mudguards were also removed at this point and
will be replaced with some lead foil prior to painting. The moulded pieces look
fine, but something a little more wavy and thin will look more in keeping with
the real thing.
STEPS 9 to 12 are
all about populating the tank with grills, toolboxes, tow cables and skirts.
Whilst the toolboxes and some of the other pieces were applied at this stage, I
will fit most of them after the scheme is set.
I am intending to darken the engine vents prior to fitting the grills.
This will give the model better depth and be a little more interesting than
just spraying everything green.
You may note, in some of the pictures you can see I have
highlighted on the instructions the parts I will need to come back and fit.
STEP 13-15 is the
turret assembly. The clear pieces and some of the finer parts are still to be
added, but the fit, moulding and engineering of the parts is all very sleek.
Step 16. Here is
where my poly cap dilemma hit me. I had used my poly caps in the drive wheels
and had left myself short for the pivot point of the gun assembly. I took a
trip to my local hobby store and picked up some small rubber washers to use as
a substitute. They weren’t the correct size, so cutting a small section out of
them seemed to get a result. It wasn’t perfect, but it would be good enough in
order to hold the gun steady on the finished model.
Whilst the instructions only call out for the 2 x poly caps,
I can’t help but feel this is an oversight in the production of the kit and it
should come with 2 more poly caps.
The barrel is supplied in two halves and came together very
cleanly. The moulding and sculpting of the material is very good and should
paint up very nicely. Here you can also
see the soft plastic dust sleeve. It looks great, but again, I fear how it will
hold the paint.
STEP 18 to 22 see
the various bits and pieces fitted off to the turret. The stowage baskets sit
together very well. They are somewhat delicate, so take care when handling.
Some photoetch grills will sit in the base of the baskets and will add some
nice detail. Bending the PE in the
baskets was a little challenging to get the shape right. Perhaps a template or
bending block would have been a nice inclusion for those pieces as their inclusion
will really set the model off.
And with a quick
twist of the turret into the body of the tank it all takes shape.
This really is a beautiful model. I can say, without
hesitation, this is by far the best model I have seen come from the Takom
factory to date. In fact, it was one of the more enjoyable models I have built
in a long time.
The fit is good, the detail is crisp and everything seems to
be in scale. The parts are engineered beautifully and are uncomplicated in
their construction. Some movement in the running gear may have been nice as an
option, but I am sure if you were that way included you could find a way to
manipulate the wheels.
For me it was like reading a good book, I found it really
hard to put it down. There is a bit of building in it, but it won’t drag out
like some other kits can.
This kit has gone together as well as I had hoped and does
meet the high expectations that were set around it. Well done again to Takom for bringing this
lovely little kit (in fact 3 of them) to the market.
So stay tuned, Berlin Brigade, here I come……
Clayton Ockerby
Thanks to Takom for
sending this out to be reviewed, this, the MK 5 and 12 will be built right here
in the next few weeks also...
See more of Clayton’s builds on his website www.theworkbench.com.au and
his Facebook page.


