Diego Fortes has released a crack force of only 100 early-war Fallschirmjäger that are ready to land on our workbench to be reviewed – we grabbed one by the ripcord to show you…
Miniaturas Fortes
Grey resin Figure13 pieces
1/24 scale (75mm)
Alternative head lead foil included
100 figures limited edition
Available for 30.00 € from Fortes
Miniatures Directly
As much as I was excited to see
the release from Diego Fortes and his new venture “Miniaturas Fortes” I was apprehensive, Short run resin is often
full of pitfalls. And this limited to 100 set certainly is limited. Though the
subject will be popular – German – elite unit - two head choices – all check! Let’s
look closer at him…
The package itself came in a
sturdy box and it was all sealed up in a zip-loc bag. This has none of the
gloss of some other figure kits out there but it does the job and a limited run
of 100 this would be almost cost prohibitive.
This figure comes in a medium grey resin that is a little stiffer than must - but the good thing for the builder is that it is not needed to work that hard to get him ready for painting. All parts are supplied attached to casting blocks, with the torso given it’s own small platform to stand on whilst you paint and work on him. The excess resin itself is not hard to remove. Though there are seam marks on either side of the torso unfortunately – I mean I don't really know if it will put anyone off as it takes only 20 careful minutes with a scalpel to remove, but I would prefer it if there were no seams to be honest this is only a small gripe on my behalf.
This figure comes in a medium grey resin that is a little stiffer than must - but the good thing for the builder is that it is not needed to work that hard to get him ready for painting. All parts are supplied attached to casting blocks, with the torso given it’s own small platform to stand on whilst you paint and work on him. The excess resin itself is not hard to remove. Though there are seam marks on either side of the torso unfortunately – I mean I don't really know if it will put anyone off as it takes only 20 careful minutes with a scalpel to remove, but I would prefer it if there were no seams to be honest this is only a small gripe on my behalf.
The parts of the kit all take a
few minutes getting free from their casting blocks which are the standard with
resin kits. This was a simple process without too much “clenching” as you might
call it – worrying if you are going to break anything. It all got cleaned up
pretty easily. Let’s go through the parts one by one.
There are two head choices on
offer here – one with the head bare and one with the iconic German short
brimmed “Fallschirmschützen-Stahlhelm 38”
jump helmet. I liked the choice without the helmet as it shows the soldier’s
features a little more than the covered up version. There was a slight strengthening
bit of resin holding on to the rear brim of the helmet which was gone in 60 seconds
like a little Nick Cage.
The face has a flat broad forrid (fore-head)
and a “bum chin” as we call it in my family – slightly Kirk Douglas-like in his
look, he will paint up very nicely with these features. The fine hair and ears,
eyes and mouth are all excellent. The helmeted version I liked a little less
because it did not bring out the heads better features. These heads were
removed from the casting blocks very easily and were easy to place in situ – as
they sit in a collar and the joint where they are removed from their casting
blocks is very flat.
The torso I left on the little
stand casting block it came on for the purpose of the review. I would gain
nothing from removing him so I left it secured – this is actually a very good
feature when constructing and painting the figure!
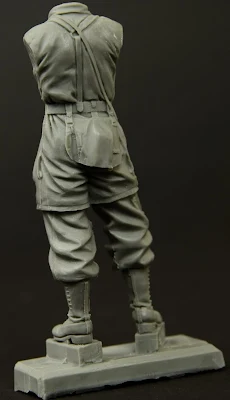
The Fallschirmjäger is replete
with his close fitting jump smock over his regular uniform tunic. The sculpting
of the smock is wrinkly where it should be but not excessively so and so it
gives a natural and “pinched” look under his webbing. He also wears some early
war tall lace up boots which cover his pants. The patched on the collar of his
tunic are there but lack insignia which I suppose can be sourced elsewhere. The
buckles, folds and creases on this torso along with his lace detail on his
boots look just great.
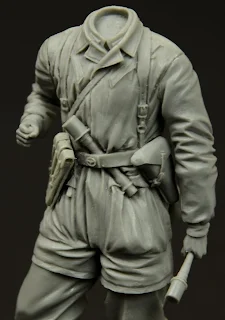
Over this smock is the parra’s
webbing on which his arsenal of ammo pouches for MP-40, main belt and M-31
canteen (in "Fliegerblau" remember) he carries a stick grenade tucked
into his standard issue belt and his webbing as well as his trusty P-38 pistol
in his holster on his left hip. Topped off underneath with his bread back on
his rear this early war parra is pretty suitably decked out.These weapons and packs of
equipment are all separate parts which are engineered to fit into the little
notches that Diego has carved in. They all look like they are attached to the
several floating attachment points that have been sculpted into the figure so
when complete this model looks very realistic in his pose and depth. This
reminds me of the type of engineering companies like Alpine Miniatures do and
it is well appreciated by this modeller.
Don't forget his SMG MP-40! This
machine pistol is cast in an unusual way and it has it’s highs and lows. The
magazine is too thick, but the detail on the sides of the mag is excellent - the stock can be posed open like I have
done or folded – which is brilliant, but it takes some concentration to get it
all set up correctly. The gun itself is good and the more you look at it the
tiniest details are all there – its just very hard to see them all in unpainted
resin. Take care with this gun and it can look excellent – myself I was in a
rush and it still came out ok.
Talking of the gun it needs a
shoulder strap doesn’t it? Well this is provided in silver foil which you have
to cut very thinly indeed. A mini guillotine is handy for this, and although
the MP-40’s strap is often folded over I left mine as a single strap. Attaching
it is a bit of a mare as you should be aware of a few things – the points of
attachment are not really there so you have to either carve a hole in the butt
of the gun for the foil to go through and attach it to the muzzle yourself. Again
the more work you put into this the better it looks – and I didn’t have long
and I think mine looks good enough for rock and roll.
Indeed though the foil is flimsy
if folded too hard it is the perfect material to manipulate. Do not forget to
drill a hole through the parra’s hand so the foil goes through! This can save
you some “clenching” like I did when I realized it after the arm was attached.
The arms of the parra are not to
be forgotten – they are attached to a small casting block each and were pretty
painless to prepare and to fit. The fitting of the joints is goo – I used some
slow drying thick superglue on this kit and it filled up any small joint holes,
you cannot really see this on the unpainted kit though.
Here he is made up from most angles with both heads for your perusal...
So there you go – a little
cleaning up and care taken and this is an excellent model. Not perfect but I can
see where Fortes Miniatures is going and I like that road. Less travelled and
worth the ride.
Adam Norenberg.
This early war “Green Devil” of
the German Luftwaffe is cast in a set of 100 figures – you can get them from
Diego’s site http://www.miniaturasfortes.com/
- alternatively check out his Facebook
page on which he is always updating you of his exploits! Thanks to Fortes
Miniatures for this kit.

.JPG)
.JPG)

.JPG)
.JPG)


.JPG)

.JPG)
.JPG)
.JPG)

.gif)
.JPG)
.JPG)
.JPG)
.JPG)
.JPG)

.JPG)
.JPG)
.JPG)
.JPG)
.JPG)
.JPG)
.JPG)

