
%20Backdate%20Set%20from%20Hypersonic%20Models%20(7).webp)
Hands on Review: F-104A (Early) Backdate Set (for Kinetic)
From Hypersonic Models
1/48th scale
Kit No #HMR 48060
3D printed grey resin, clear resin canopy & vinyl masks provided in the kit.
Price: ¥4500

Hypersonic Models is an established after-market manufacturer based in Japan, focusing on detail and update sets for primarily 1/48th scale modern jet subjects.
In this review I'm going "hands-on" with one of their latest 3D printed conversion sets. (48060) F-104A (Early) Backdate Set is designed for the Kinetic F-104A/C (K48096) kit to build an early F-104A with the downward firing C-1 ejection seat.
The early F-104A kit from Kinetic that this set is designed for...
%20Backdate%20Set%20from%20Hypersonic%20Models%20(1)2.webp)
The set includes parts from their original F-104A (Late) set (48057) (lower fuselage insert, alternate hot air exhaust panel, L-brackets) plus the C-1 seat, ejection rails, rear cockpit bulkhead, forward turtle deck face, a new canopy with complete and highly detailed de-mister tubing, aft canopy support brace, control stick and throttle, instrument panel and three different types of coaming. The canopy is cast in clear resin (UV stable) from a 3D printed master, all other parts are directly 3D printed.

For this review I'm going to work my way through the four instruction pages provided with the set. This way we can see all the items included and give you a chance to read all the useful information that Hypersonic include about the set.
As with any resin set, the first task is to remove the parts from the casting/printing supports. Hypersonic provide very helpful color drawing that explain the optimal way to work with 3D printed parts. It's basically work from the outside in, removing first the red, then green and finally blue parts. As you can see from the photo of the canopy framing, these parts are very fine and delicate. Take your time and use good quality cutters or a new blade to separate the tips of the supports tree's from the parts.

Many of the parts in the set are thin and need many supports to print accurately. The fuselage "L" doublers are long thin fragile parts so be extra cautious when working with them. Pay attention to the color callouts provided by Hypersonic to reduce the risk of damage to the parts when cleaning up.


The lower fuselage insert is perhaps the largest single piece in the set. Work your way from the outside to remove the supports. This makes room to be able to reach the inner supports safely. It's time consuming work but slow and steady wins the race.

Hypersonic providers a full set of the reinforcement doublers applied to certain F-104 during their life. Be sure to check references for the specific airframe you are modeling as YF-014A and very early F-104A's did not have these. As explained, the doublers began to be fitted before the C-2 seat conversion so Hypersonic have included them in this early set for completeness.

The part which requires the most work on behalf of the modeller is the Hot Air Vents. To install this part requires some minor plastic surgery to the Kinetic port fuselage. Again, check your references to see if your subject had the staggered engine compartment vent louvres before you start cutting.

Hypersonic provide a vinyl template which you apply to the kit fuselage. This is used to allow you to mark the position of the lower cut line for the new resin insert panel. The other three cut lines are along existing panel lines on the kit. You can use a scriber, like I did, or a pencil to draw along the lower edge of the template.

WARNING: THE SUPPLIED VINYL TEMPLATE IS TOO SMALL. THIS WAS A PACKING ERROR AND HYPERSONIC ARE AWARE OF IT AND WILL PROVIDE A CORRECTED PART IF YOU CONTACT THEM. Thankfully the template is smaller than needed so no real damage can be done. It just means you need to cut approx. 2mm larger than the template as shown below.

With the correct location for the cuts marked on the model, you can start hacking away. I like to visibly mark the parts to be removed so that I don't forget and cut incorrectly. Just remember the old saying "Measure twice, cut once".

There are numerous tools that can be used to cut opening into plastic, chain drilling is a popular one. In my case I happen to have an "ultrasonic knife", which is a specialist tool that I don't use all that often but in cases like this it is perfect to make short work of cutting the thick fuselage plastic away. The blade vibrates (at an ultrasonic frequency) and this allows it to cut through plastic and resin like butter, requiring only minimal pressure. The one side affect of the vibration is friction, which leads to heat, which can begin to melt the plastic if you are not careful.

With the center of the kit panel removed with the ultrasonic knife we can use files, sanding sticks and a sharp blade to remove the rest of the material, right up-to the edges of the template.

The resin panel can now be seated and glued in place (with CA or epoxy glue). Note that as per the instructions, the lower cut line needs to be filled and sanded smooth as this is not a natural panel line.

With the hardest work done we can now relax and turn to an easier modification part. For the lower fuselage insert, Hypersonic provide a direct drop in replacement for kit part B5. This is needed primarily to cater for the fact that the early F-104A's had no shell ejection chute for the M61 cannon. The chute (as supplied in the Kinetic kit) was added from the F-104C onwards.

As noted in the assembly instructions, most YF-104A and some F-104A's did not have the pointed barrier deflectors on the nose gear doors. To cater for this you will need to cut off the kit parts and use them to fill in the cutouts on the lower fuselage.

A side by side comparison of the Kinetic kit part and the Hypersonic replacement. The resin is a perfect fit and the subtle differences between the kit and Hypersonic's modified part can be appreciated here.


Turning now to the cockpit, Hypersonic have designed a more detailed version of the aft turtle deck vertical face. Kinetic provides some detailing on the plastic part but nothing compared to the superior resin part. No cutting or trimming needed here, this is a direct replacement for the kit part B48.


A new rear bulkhead for the cockpit is provided and to allow this to fit a small section of plastic tubing needs to be cut away. A simple job requiring only a sharp knife.

The new bulkhead now drops into place using the existing holes on the floor. As anticipated the fit is perfect and the detail very eye catching.

A complete new instrument panel and throttle/control column are included. Once again these are fit perfect direct replacements for the equivalent Kinetic parts.

Comparing the Hypersonic and Kinetic parts reveals several differences between the two. I have not looked in this in detail but I imagine the Kinetic part is closer to a later A/C than the early A's which is why the new IP was needed when backdating.

Hypersonic have gone all out when it comes to including options for the main coaming. These are superbly detailed and give the modeller full freedom to match the aircraft they are building exactly.

These parts are just dripping with detail and much of it will clearly be seen through the kit windshield. It occurs to me that which ever two you do not use can be kept and used on other F-104 builds.

The kit "canopy pyro charges" on the canopy sills need to be removed as these were not installed with the downward firing seat. While on this subject I'd just like to lodge my complaint with Kinetic that they ever molded these things onto the fuselage sills in the first place !! I can only imagine how many of these have been broken off models during the build process, no matter how careful you are.

To allow you to appreciate just how detailed the cabling and wiring in these coamings are, here are some close up photos. Enjoy.

Each coaming is a drop fit to the kit and between it and the rear bulkhead improvements really lift the appearance of the Kinetic kit.

Perhaps the centerpiece of this backdate set is the Lockheed/Stanley C-1 Ejection seat. Hypersonic have taken full advantage of 3D printing and provide the seat as a single piece which you only have to paint and weather. The seat is designed to accurately slot into the new rails provided in the rear bulkhead part.

The F-104’s tremendous speed presented a problem for ejection. It flew too fast for pilots to clear the tail assembly if they were thrown out of the plane with standard upward-firing ejection seats. Older aircraft were easier to escape due to slower speeds, but the high velocities of the new airplanes required new ejection engineering.
Stanley Aviation provided a solution with the Stanley C-1 Ejection Seat. It fired downward, which at the time was the only way to save crews in emergency situations for aircraft like the F-104 and the B-47 bomber. The seat had a series of complex mechanisms, including metal “spurs” on the heels of the pilot’s boots that slotted over steel balls at the foot rest (giving F-104 pilots the nickname “Cowboy”). The balls attached to cables that kept the pilot’s feet in place during the ejection sequence.
While downward-firing seats prevented collisions with the tail, they introduced a new set of problems. Stanley Aviation eventually came out with the Lockheed C-2, which fired upward using more powerful rocket catapults, thus clearing the tail with safety. The era of the downward ejection seat came to a quiet end. veteransbreakfastclub.org

Hypersonic's C-1 seat is simply a work of art. I'm continually inspired by what aftermarket companies are releasing using 3D design and printing technology. The seat fits neatly into the Kinetic kit tub with no drama or effort.

To help when it comes time to paint your C-1 seat, here are a couple of color photos to use as reference. More information be found at ejectionsite.com

To backdate the canopy, Hypersonic have designed a new super detailed canopy with complete and highly detailed de-mister tubing.
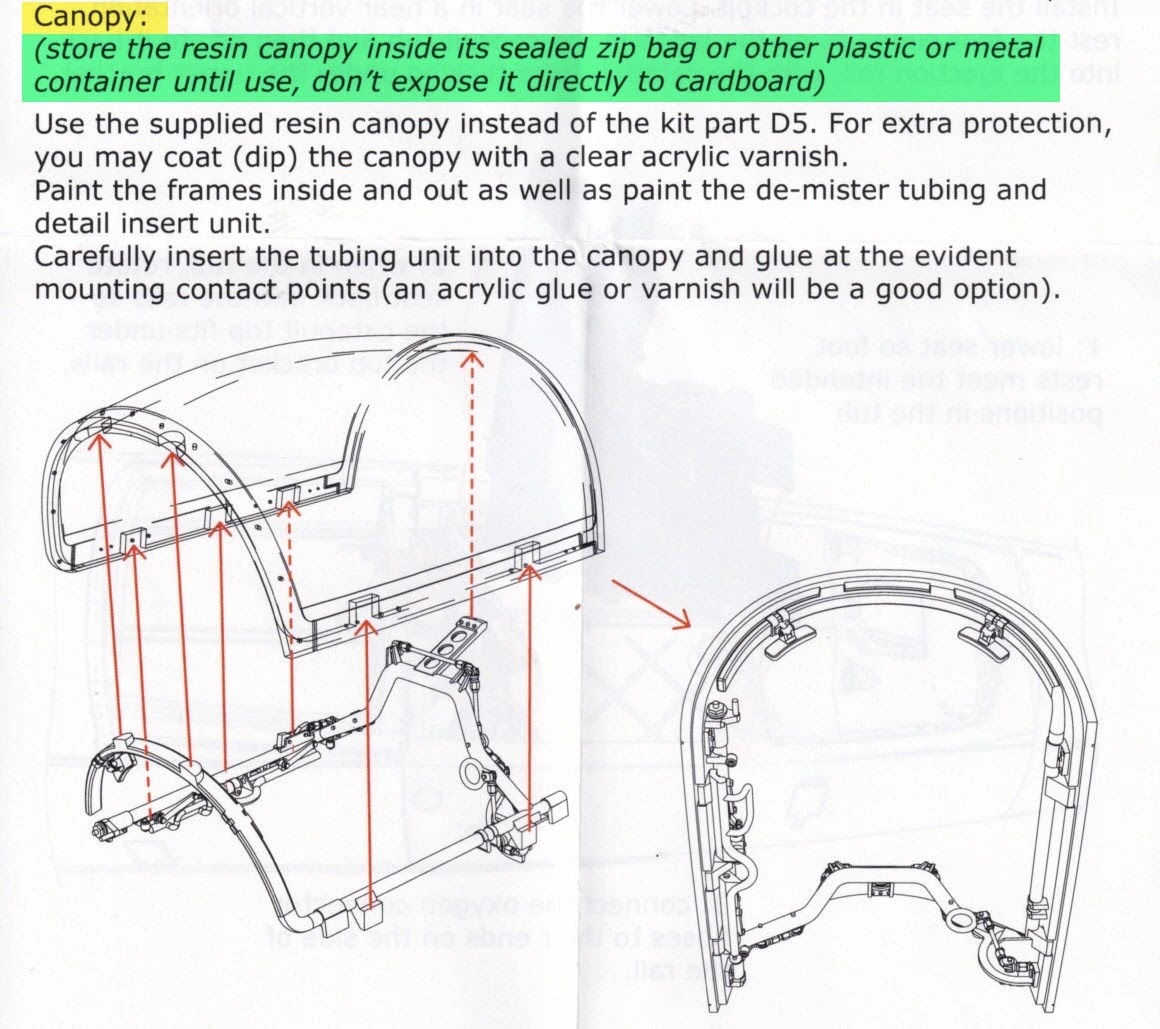
The Hypersonic canopy is cast in clear resin (UV stable) from a 3D printed master. One small pour block is located on the canopy side and can be cut off and cleaned up with little effort. This part is well engineering to make the modellers life as easy as possible, not always the case with other manufacturers.

The canopy frame is printed as a single piece and requires a VERY light touch to separate from the printing supports. The main body of the frame is very thin and you really want to avoid putting too much pressure on it. Small alignment notches to secure the frame to the canopy are thoughtfully provided by Hypersonic, making the assembly far easier.

A more detailed control and throttle column is included in the set. The lower canvas boot/cover looks quite realistic.

One final photo showing the mix of kit and resin parts. This set really is a joy to work with and will take your early F-104A up a notch (or two).

CONCLUSION - Hypersonic Models 1:48 F-104A (Early) Backdate Set for Kinetic (48060)
Hypersonic have really hit this one out of the park. The attention to detail and care with the research is exceptional. The execution in the design, printing and packaging of the set makes this . There really is nothing negative to say about this set.
The one small glitch I found with the fuselage vinyl template was easily fixed and when I mentioned it to Jeff he immediately updated the website and Facebook page to offer a correction to customers. Excellent customer service is just another feather in Hypersonic's cap.
I certainly have no hesitation in recommending this detail set for your F-104A build.
Gary Wickham
This kit is now available for ¥4500 (around $30 US) you can get this kit at the Product Link on the Hypersonic Models Website Thanks to Hypersonic for sending this set to Gary to review...

You can see more of Gary's Work on his ScaleSpot.com Website & his Facebook page.

ASSEMBLY INSTRUCTIONS - Hypersonic Models 1:48 F-104A (Early) Backdate Set for Kinetic (48060)
.webp)
.webp)
.webp)
.webp)
.webp)
.webp)
.webp)
.webp)