We have just seen two more concepts of the Me 262 added to this, the first kit in this series from Amusing Hobby. Today we see the Me 262 HG III in 1/48th scale in Gary's excellent build (Pt.I)...
Build Guide Pt.I: Me 262 HG III
From Amusing Hobby Kit No #48A003
1/48th scale
Plastic injection moulded kit.
Two marking choices included in the box
RRP: $22 USD from Hobbylink Japan
The Subject:
The Messerschmitt Me 262 was a German World War II fighter aircraft built in the later stages of the war, and under license by Avia post-war. Messerschmitt began work on a single-seat jet-powered fighter before the start of World War II. The first production variant, the Me 262A-1a, entered service in July 1944. This variant, nicknamed Schwalbe (German: "Swallow"), was powered by two 8.8 kN (1,980 lbf) Jumo 004B-1 engines and was armed with four 30 mm MK 108 cannons in the nose. In April 1941, Adolf Busemann proposed that a 35° swept wing be fitted to the Me 262. Although this was not implemented, it did lead to the development of the Hochgeschwindigkeit ("high-speed") project to improve the Me 262's speed. In 1944, the Me 262 V9 prototype was modified with a low profile canopy, known as the Rennkabine ("racing cabin"), as the Hochgeschwindigkeit I, or Me 262 HG I.
The more radical Hochgeschwindigkeit II (Me 262 HG II) proposal was to feature a new 35° swept wing with engines moved closer to the fuselage and a V-tail, though this was changed back to a conventional tail after wind tunnel tests showed that the V-tail was unstable. The Hochgeschwindigkeit III (Me 262 HG III) was to have a 45° swept wing and Heinkel HeS 011 engines in the wing roots. Neither of these projects were built.
KIT OVERVIEW - Amusing Hobby 1:48 Me 262 HG III (48A003)
Amusing Hobby have quietly been working to tap into the popular Luft '46 market. I do not consider myself to be a "what-if" builder, but I do like Luft '46 as this genre is mostly based on actual drawings or prototypes known to have existed, plus they mostly look cool.
So far they have released three 1:48 aircraft kits, with more planned for 2024 and each is a Luft '46 subject. After completing my Amusing Hobby 1:48 Focke Wulf Triebflügel (48A001) Review back in 2019, I remember being impressed with the tooling and quality of that kit. I've subsequently obtained the Weserflug P.1003/1 VTOL (48A002) and now this Me262 HGIII (48A003)

This week we also see Amusing Hobby are releasing two variants of this kit, in the Me262 HGIII Concept 3 & the Me 262 HGIII (V-tail)
The kit:
Amusing Hobby have chosen a cream/tan coloured plastic. This looks a bit odd in the box but when building I found it to be easy to work with. The Me 262 HGIII kit is contained on two main sprues with a single small clear sprue, with a noticeably lower parts count for a 1:48 model when compared to the likes of Eduard or Airfix. This is not a bad thing and often leads to a faster, easier build.
COLORS & MARKINGS - Amusing Hobby 1:48 Me 262 HG III (48A003)
Amusing Hobby provide two fictional marking schemes in the box. Both are based on late war Luftwaffe colors of RLM 70/81 and 81/82. You can pretty much let your imagination run free here as these aircraft were never built, let alone enter active service.The decal sheet is fairly small and for the most part generic in nature, which is to be expected given the subject matter. The decals are printed by Amusing Hobby and appear to be quite thin and in-register. As is common practice, the swastika is broken into multiple parts.
The decal sheet...
BUILD - Amusing Hobby 1:48 Me 262 HG III (48A003)
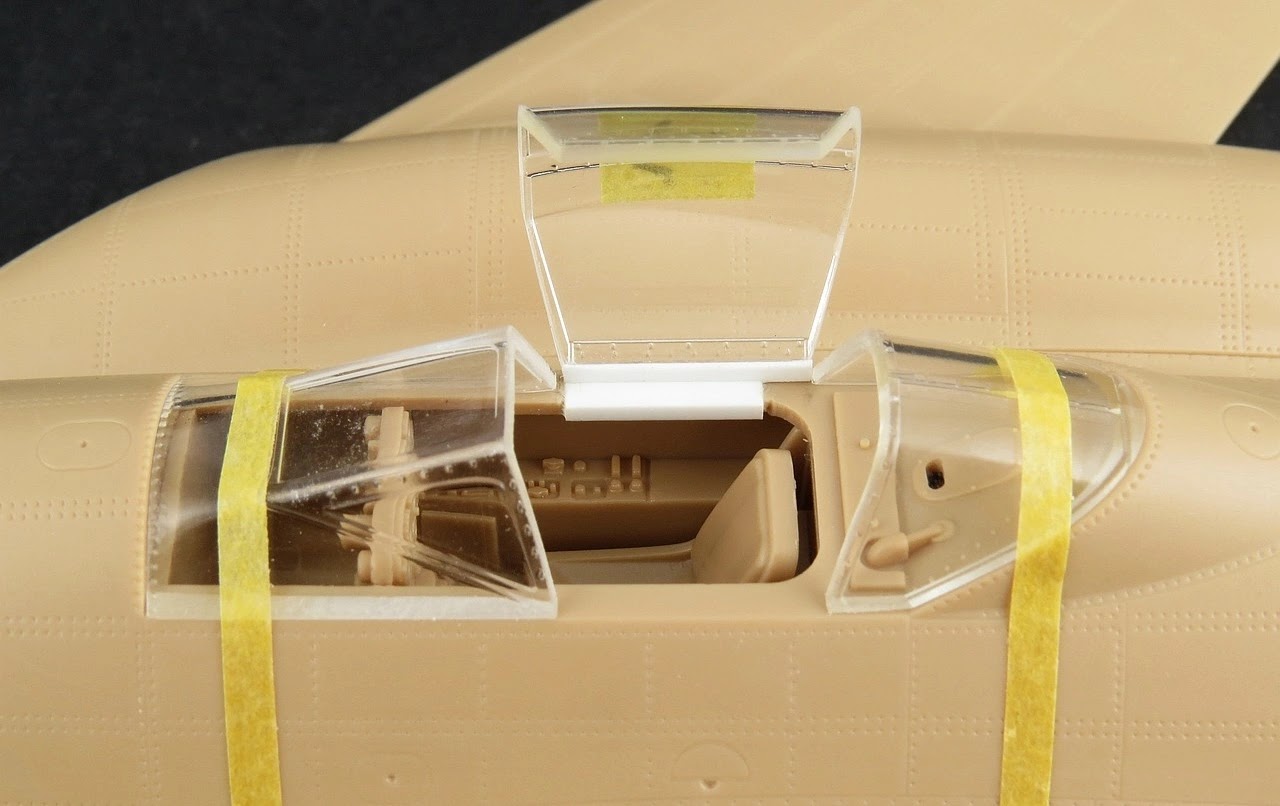
For the most part I prefer to have my aircraft canopies open, if I display them on the ground. The only time I close them up is when I pose the model in flight. Amusing Hobby provides only a closed option for the main canopy and so I had to decide early on whether to model the Me 262 HG in flight or cut the canopy open. Thankfully the cut lines needed for the second option were all straight and this made my decision an easy one. When cutting I like to have some visual guide in place so make it easier to see where the blade needs to go. For this I use some flexible Tamiya vinyl tape as it's easy to apply around curves and offers some minor resistance to the blade. It's not meant to be a physical guide because the razor saw would easily cut through the tape if I was not paying attention.
Once the canopy was separated from the front windshield and rear shroud a simple right-angle mounting support was built from plastic card. This allowed the canopy to be held securely in the open position on the starboard cockpit sill.
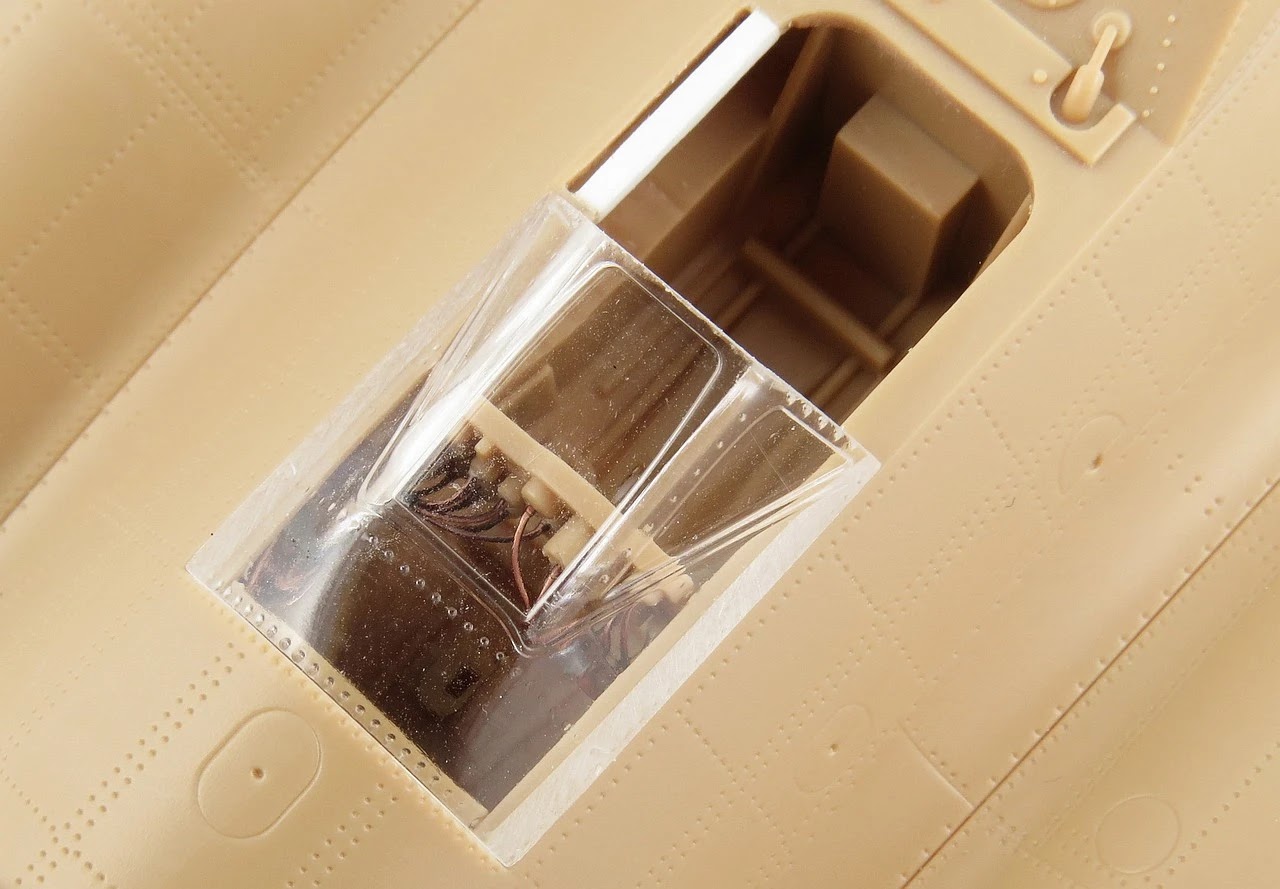
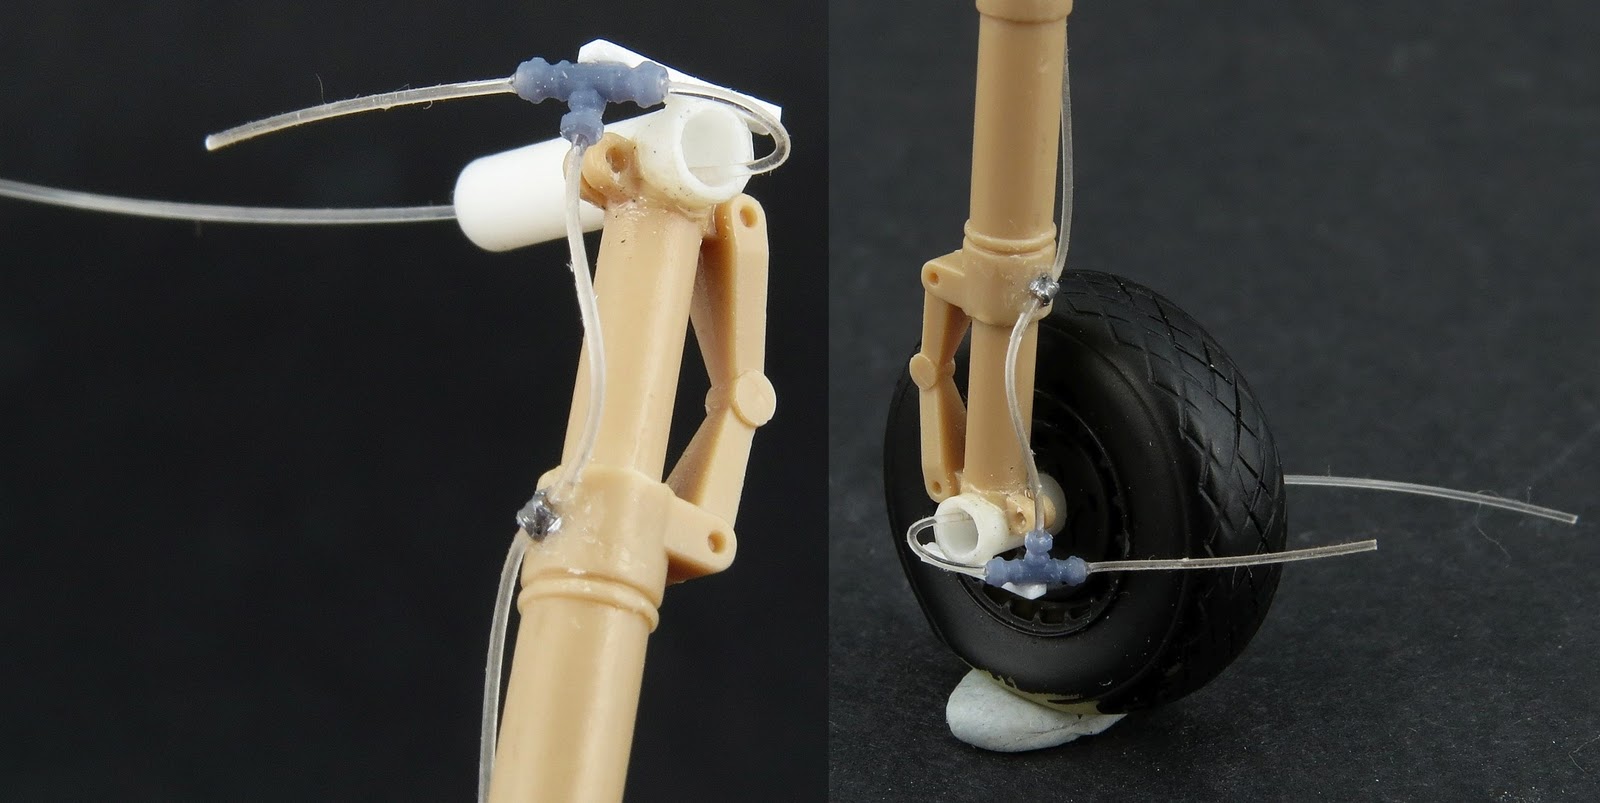
It becomes obvious that the kit canopy is quite thick once you cut it apart. There really isn't an easy way to correct this, short of vac-forming a new one yourself, so in this case I will live with it. Some extra details such as the grab handle and support brace inside the open canopy will be added later on.When fully open the canopy lower edges sit at 90 degrees. My scratchbuilt hinge is held in place by a slot in the sill which was added also using plastic card. In this way I can remove the canopy during assembly and painting and slot it into place at the end of the build. The kit cockpit is very well appointed out-of-the-box. No belts are included so you will want to make your or purchase a set from Quinta or HGW. I was impressed that Amusing Hobby provided the rear of the main instruments because this area is quite visible on the Me 262 (through the forward armoured windshield). Being late war, the cockpit color of the Me 262 was RLM 66. The cockpit itself seems to be very tidy with minimal clutter. Wishing to enhance the rear of the main IP, I drilled holes into the back of each instrument and added 0.25 and 0.3mm copper wire. One easy technique when working with copper wire is to "anneal" it first to soften the metal. Once softened the copper is far more malleable resulting in far more natural bends and twists without kinking. To anneal copper, you expose it a naked flame (say a BBQ lighter or similar) and heat until it glows orange. Remove the flame and let the metal cool slowly (just sit it down until it is cold to the touch). Do not cool it quickly (by dunking in water) as this will harden the copper, making it brittle. A quick test fit of the cockpit and windshield reveals the "method in my madness" as now we will have a good view of the cabling through the clear parts. Changing gears, I next turned my attention to the landing gear (undercarriage). The Me 262 employed hydraulically activated main brakes and the flexible piping was threaded through the hollow tubular axle. As you might expect, Amusing Hobby do not provide this detail and I wanted to see if I could fabricate it from scratch. After a bit of head scratching and experimenting I settled on using styrene tube for the axle and 0.3mm Invisible Nylon Thread for the hydraulic lines. I prefer the flexibility and springiness of nylon for such work as I find it bends more realistically than copper or lead wire. I also needed a scale "three-way" connector and a digital download of ANYZ's 3D Connectors T-Type (AND054) for 3 euro's allowed me to print up a lifetime supply. A dry fit of the main gear into their mounting points showed me that the fit is excellent and alignment close to perfect. As I considered the kit wheels to be too thin and the hubs poorly detailed, I replaced them with a spare set of True Details resin wheels. The kit nose gear needed no major adjustments and fits snugly into the gear bay. I did however add a single brake line, this time using annealed copper. The kit nosewheel was very respectable and I will use it rather than the one from the True Details resin set (which is the smooth tread version). As usual in my builds, I like to drop the elevators (and often flaps). In this case it meant a clean straight cut and then re-adding the counter-balance from 60 thou card strip. A quick and dirty way to get the desired droop angle is to sand the leading edge of the separated elevator and then glue it back in place. The interior of the Me 262 was very open and so much of it is visible through the gear bay openings. Amusing Hobby has made not effort to give us any kind of structural details and so I used some Evergreen 10 x 20 thou strip. It's all guesswork and is only meant to "busy" up the open bay when viewed from below.
I worked my way along the interior surfaces adding ribbing at what seemed like the most logical places and in short order things looked a bit more interesting. It's worth mentioning that the fit of all the interior parts is very good with most sub-assemblies clicking into alignment. The HG III variant would have had pretty standard air intakes and Amusing Hobby provide this in two halves (top and bottom). To deal with the resulting seam I applied several brushed on coats of Mr Surfacer 500 and when dry each layer was sanded smooth using GodHand Kamiyasu Sanding Sponge #600-2mm. I like these flexible sanding sticks as they easily conform to circular shapes such as intakes and exhausts. The progress was checked using Mr Finishing Surfacer 1500. The unique shape of the HG III has led Amusing Hobby to engineer the tail of the kit in two horizontal halves (left and right) whilst the main fuselage is top and bottom halves. The join between the tail and fuselage means we have some seams and rivet runs that need some attention. I have recently started to use VMS FLEXY 5K CA Super Glue (BLACK) as a filler as I like how the black tint provides an obvious visibile indication of where the glue/filler remains after sanding. Of course, as with any seam work, the only way to know for sure is to use a light coat of primer, in my case Mr Finishing Surfacer 1500 Gray As I was getting close to laying down some interior paint, it was now time for masking. Whenever I display a canopy open I make a point of masking and painting the interior framing as well as the exterior. My weapons of choice for hand masking (as opposed to the increasingly popular pre-cut masks) is plain old Tamiya tape (1mm, 2mm and 3mm most often in 1:48) and liquid Mr. Masking Sol R for those tiny fiddly bits where tape won't fit. One feature of the new 3D printed decal interiors from Quinta/Red Fox/Kelik/... is that they end up with a semi-gloss finish, which is often not very scale accurate (ie they look to shiny). My solution is to flat coat the whole set (once installed) and then pick out the dial glass faces by hand using a gloss or semi gloss clear. This to my eye helps to tie the 3D vinyl parts to the rest of the cockpit. WW2 era seats had rudimentary safely belts. For the most part these were fairly standard across aircraft from each country. The Luftwaffe used belts from cloth/fabric and leather in most of it's fighter aircraft, the Me 262 being no exception. There are many ways to reproduce scale aircraft belts, but one of the most realistic I have found would have to be the fabric sets from HGW Models. These belts are provided as separate fabric straps with the buckles in PE. You literally have to assemble the belt just like the real thing. One tip I have learnt is that it's much easier to thread the fabric straps through the buckles which still attached to the PE fret. Trying to do it the other way around and thread the PE buckle over the strap is a good way to loose your sanity (and the PE buckle) very fast !! It's time consuming and painstaking work, but the results speak for themselves. HGW make belts in 1:48 and 1:32 for a wide array of WW2 and Modern aircraft. They seem to be readily available at most online hobby shops or you can purchase from HGW Direct. The cockpit is mostly complete at this stage and I have applied a few layers of enamel washes and pigments to represent the theater of operation my Me 262 MH III would have operated in. More on that later in Part 2. Stay tuned.
Gary Wickham.


.webp)
.webp)
.webp)


.gif)


.webp)
.webp)
.webp)