Video build review: MiniArt's 1/35th scale Raupenschlepper OST RSO/01. Early Prod
The best way to really get to know a new kit is to build it. Clayton Ockerby does just that with MiniArt's new 1/35th scale Raupenschlepper OST RSO/01 Early Production kit. Part I in a weekend? See what he thinks in the first part of his video build guide...
Video build review: MiniArt's 1/35th scale Raupenschlepper OST RSO/01. Early Prod
The challenge was to start and finish this NEW Miniart RSO over a weekend so I could bring you the build review. and if any of you are familiar with Miniart kits that may be considered a little ambitious. But I like a challenge, so I committed to the 48in48 group build raising funds for Models for Heroes. If you haven’t heard of it, check it out. It’s a great cause doing great things.
I’ve been lucky enough to receive, what I believe to be one of the first kits in Australia and have been asked to do a review on behalf of The Modelling News. An initial, quick review of the parts didn’t raise any major concerns.
Some sprue shots to prime you up! Roadwheels look great under some detailing and painting.
The link and length tracks are fast and easy to assemble, an look great once in place
The wooden surfaces are adequite as they are but I will detail and age them more than this.
Suspension with weld marks clearly shown here.
Beautifully detailed canvas for this one.
More of the inside of the cab
Seats of the RSO here...
Beautifully detailed drive sprocket casings
The full engine is here in good detail if you want to model it.
Controls of this vehicle are a little interesting.
The pressed metal look of the interior structure of the cab
The clear parts
There is also some small photo-etch parts included in this kit—nothing major!
MiniArt has printed their own decal sheet for this kit
The detail and moulding all seemed to be of a high quality. In particular there is some delicate welds moulded around some of the parts that are hard to detect unless under magnification but present none the less.
I am going to sideline a couple of other builds for the moment and get this built and reviewed for you immediately. I was loving what I was seeing and couldn’t wait to sink my teeth into this one
This Early Production RSO comes for 4 schemes, giving the modeller a reasonably good selection to choose from, with the two white washed examples providing an interesting challenge as to how to best execute the scheme.
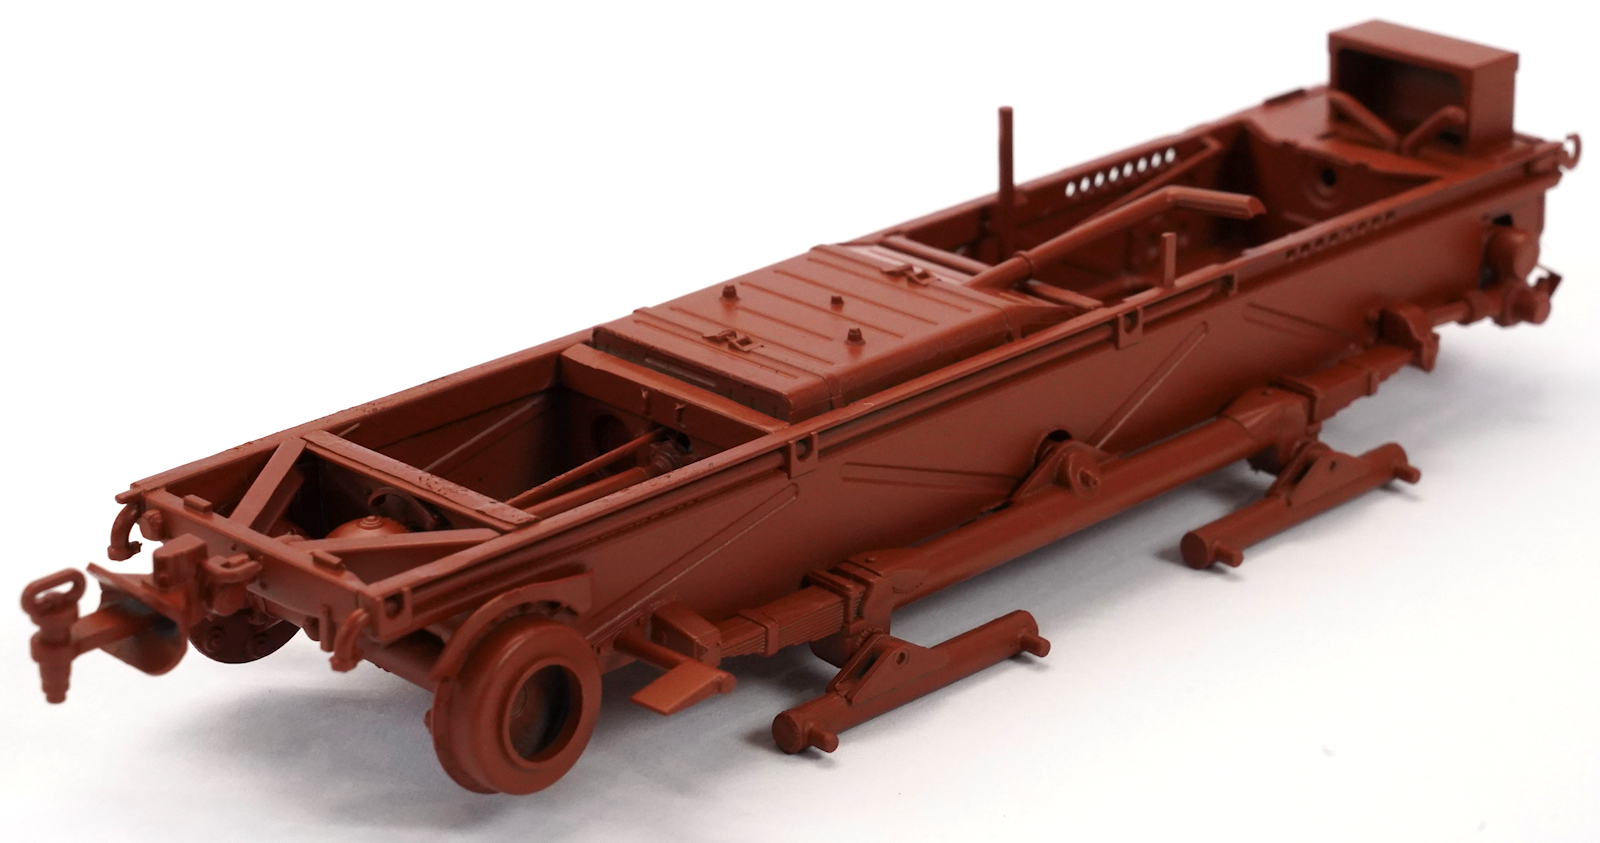
The chassis section is the first part of the build as this will form the foundations of the vehicle. The instructions suggest fitting the cross sections first, but I found it was easier to fit the side walls first as that helped them bracing find their positions.
The fit wasn’t the best and a bit of muscle was required to squeeze them together. There was a small gab between some of the parts that would require filling, but that would need to be addressed at a later time. There are a number of protruding pieces that need to be removed from the top edge of the chassis, so make sure you have your wits about you and remove the correct ones, as one needs to remain on this version of the RSO.
The fuel tank, mud scrapers and tow point are attached. The kit comes with a couple of options for the tow position, so check references if that is important to you.
The rails for the suspension system have a small etch guard that need to be bent and fitted. There is no folding template however the way it should sit should be reasonably easy to work out. Once fitted the rails could then be glued in place.
The instructions call out for the chassis to be finished in a red brown, which I assume is their interpretation of a red oxide primer. I have a Mr Surfacer rattle can of Red Oxide, so out the back for a spray session and the chassis with the fuel tank installed was painted and ready to go.
Continuing with the sub-assemblies, and the kit comes with a highly detailed little engine. My hope was to pose the front hatch open and get a look at the engine, so I wanted to give this the attention it deserved. The foundation assemblies were built and primed in a black primer so the detail painting could take place.
The engine block was first painted in a dark grey and lightened in spots with a lightened grey mix.
I then employed a dry brushing technique with AMMO - Gun Metal acrylic to introduce those gun metal tones as well as add some variation to the finish.
Details could then be painted in using aluminium and black. Painting with acrylics often takes multiple passes, so please be a little more patient than I was.
The fans at the top of the engine block received sponge chipping with a NATO brown and the exhaust pipes were painted in a similar way using the sponge to apply the paint. The section will be enhanced with washes at a later stage, well at least that was the plan.
The wheels had been primed in the last few drops of black Mr Surfacer I had and the grey colour was created with a mix of Dark Grey and white. I am letting that dark primer influence the colour and I am purposefully painting light because I know the weathering will deepen everything up once it comes to apply it.
Like a lot of kits these days the model comes with the link and length style of track. After the pieces have been removed and any connection paints cleaned up, I can create small lengths of the track using Tamiya extra thin through the joints. After a few minutes I can then roll the small lengths around the drive sprockets, and they will hold their shape. I can then start piecing in the other lengths. As each joint dries I can add another length until I have the bottom run assembled.
I’m building these tracks so they can be removed to be painted. You might have seen me pre-paint these previously but because the plastic was so soft to work with, I didn’t want to risk the paint compromising the glued joint, so chose this method.
With the wheels glued in place and the link and length tracks assembled (but not glued to the wheels), the chassis and running gear was starting to come together.
The tracks could then be removed and painted in a Tamiya Iron colour, being able to remove the tracks likes this simplifies the painting process greatly.
The engine was squeezed in the chassis assembly. The fit is again extremely tight and required some ‘gentle persuasion’ to nestle in place. It was here I got the impression the engine was going to be all but impossible to see through that front hatch and the couple of hours I spent on it might have been for nothing.
The newly painted tracks could then slip over the wheels and the remaining connection point was held in place with a drop of superglue.
The red oxide elements had also been treated to an enamel pin wash using Tamiya Black Panel liner.
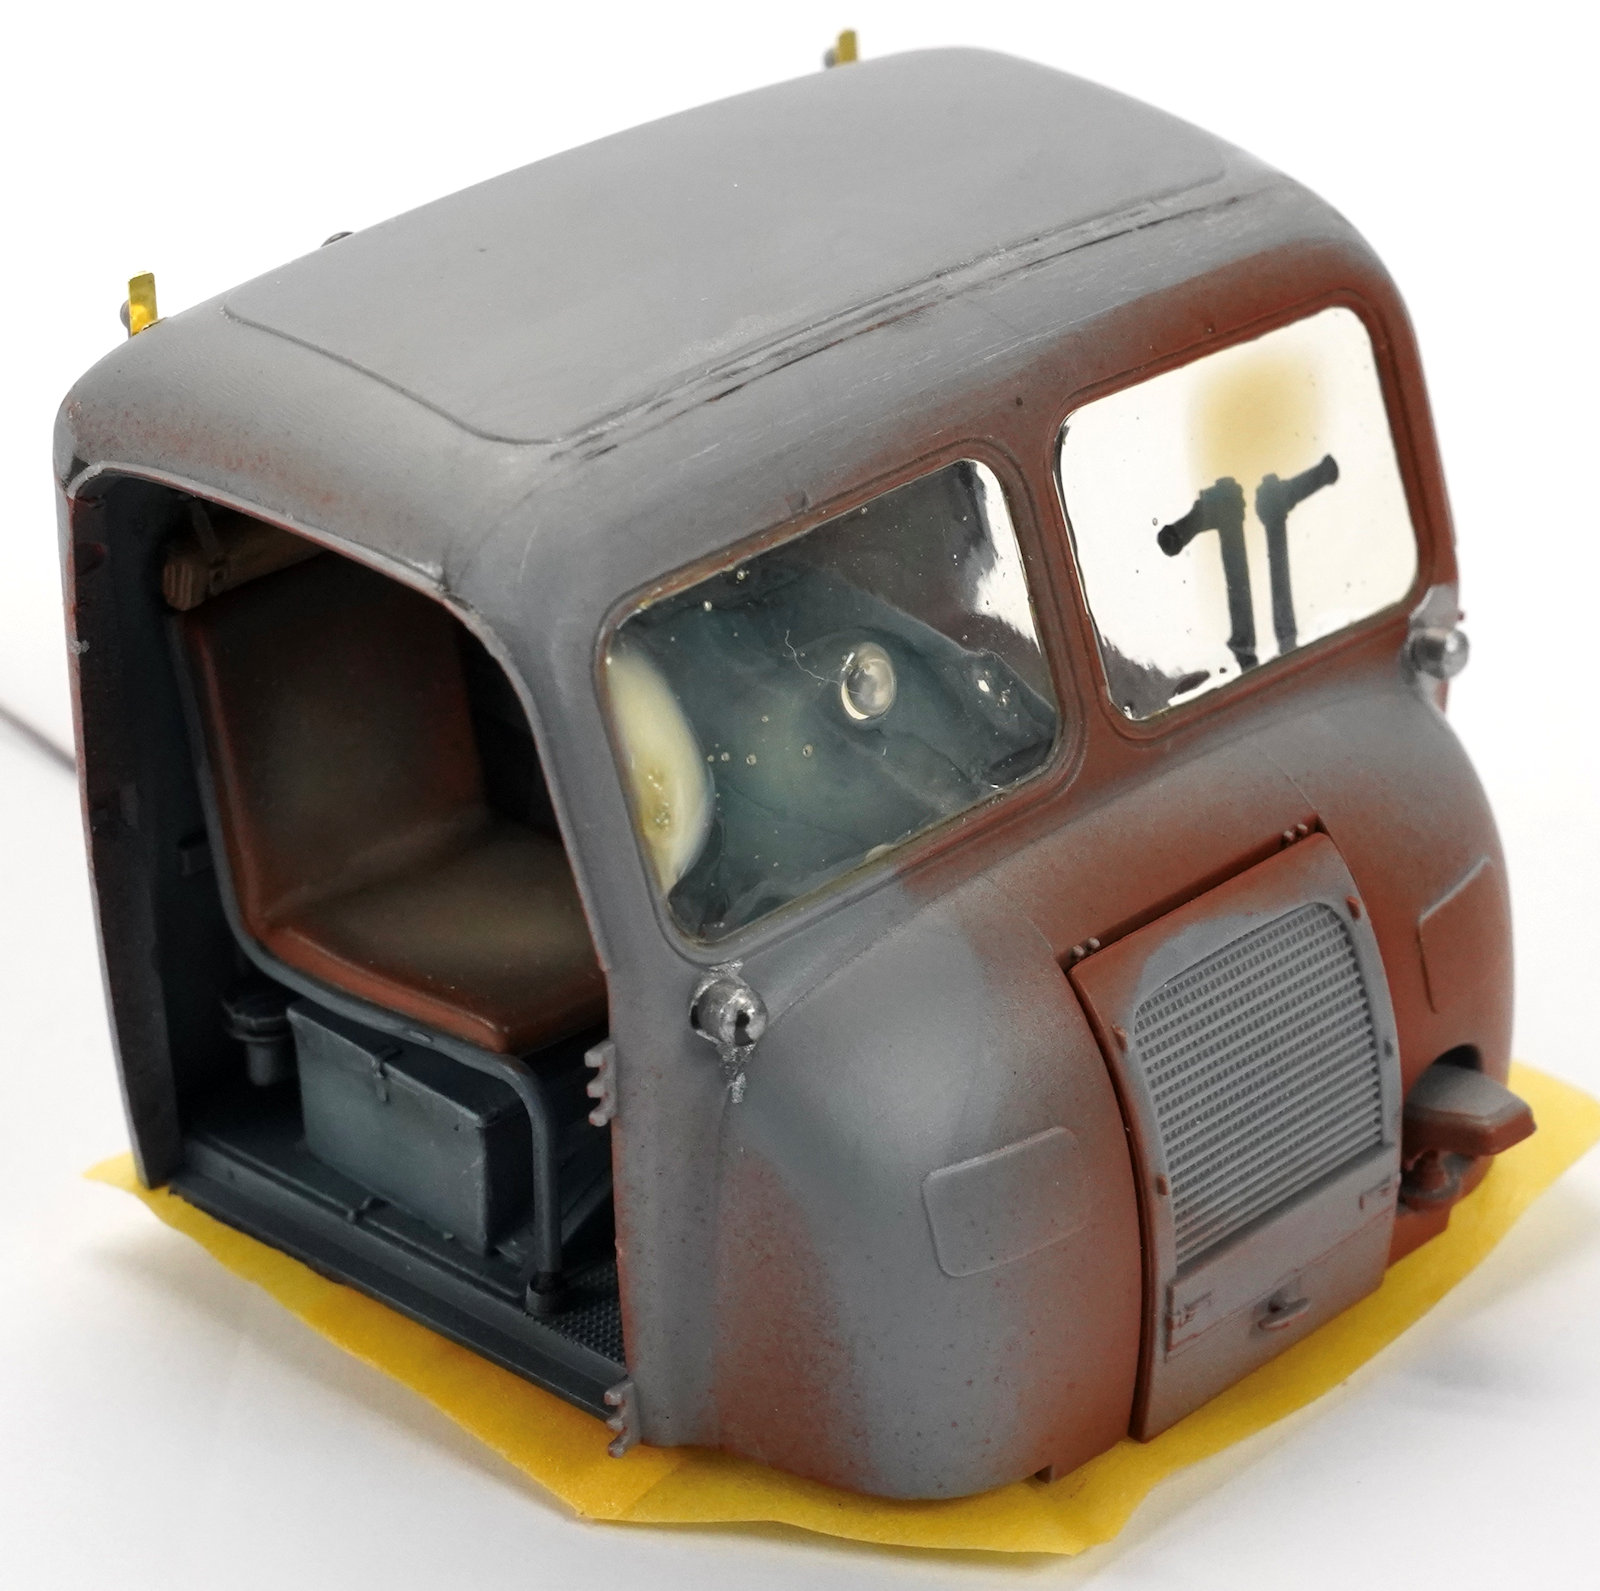
Moving back to the cabin now, and the doors come together in two halves, and the way its made represents that pressed sheet metal, hollow style of door really nicely. There is also the option to have the window up or half down, but I left that out until after paint.
The cabin interior is broken into two halves. The passenger and the driver side with the controls.
The rear wall of the cabin and the dash can be seen in this picture, and the two sides of the interior will soon be attached to that section.
I could then prime the interior in a Mr Surfacer Red Oxide colour (mainly because I’d run out of my usual black), so once primed I painted the whole assembly in a black lacquer base. Although I did leave the red primer for the underside surfaces.
The instructions give you an option for the interior colour. A Sand or a Light Blue / RLM 78… without any explanation. I’d tried to find some information around these colours but didn’t come up with much other than the interior would most probably have match the exterior. Sounds logical, but given it was calling out of Light Blue and the exterior would be Dark Grey it wasn’t really adding up… I was painting from that black base, so I split the difference and made a mix of the RLM78 And dark grey and started applying the colour, letting the black base influence the finish.
I could then move back through and start adding highlights using the RLM78. That colour was no where near as blue as I thought it would be and ended up giving me an interesting base tone to work with.
The details received a dry brush using Pale Grey acrylic, and then finally an enamel pin wash was applied using Blue Brown.
The clear pieces for the front windscreen can be glued in place, and I carefully let the extra thin migrate around the gaps to hold it in place against the styrene surround.
The roof is the bridging piece for that rear wall and the front face of the cabin. I was a little disappointed it was done like this and not as a single piece that would cap over the interior. Gluing the roof in place like this meant there were two prominent seams that would need to be filled and sanded. The tension and pressure in the parts was quite significant, so I opted to use superglue to ensure the bond would be quick and strong.
The instructions call out for a length of wire to go on the rear of the cabin that would need to be cut and bent into shape. This doesn’t come with the kit and honestly is a big ask for the average modeller to be able to execute something like this. It looks to be an air outlet for the fuel tank and is a nice detail, but with no bending pattern or diagram you are left to your own devices to work it out.
I did the best I could under the time constraints I was working with, so it was far from perfect, for the limited vision this detail will get it would be good enough.
It’s also worth noting the tool clamps come with the etch handles which add a nice level of refinement to the section.
The clear parts were masked using a VMS latex mask and the front hatch and the doors will soon be temporarily held in place with bluetac in preparation for paint.
Moving to the tub now, and whilst the part looked OK, I felt it could use a little help to better represent the grain in the timber. I’m using a riveting tool to create these timber grain textures. By dragging the serrated teeth in a non-structured way, I am able to scribe the plastic and create timber-like grain in the parts. Once done I give it a light sand to remove any fluff form the plastic and then use a scriber to reintroduce the plank detail the riveting tool might have damaged.
The sprue before the aging process began...
A quick brush with modelling cement removes all of the styrene dust and debris and just like that the detail has levelled up. Looking at them side by side there is no comparison
With all the sides textured I could then assemble the box tray and prime it.
The canvas cover for the rear was then assembled. The ‘front’ is clearly moulded in the underside of the part. It will be all but impossible to see, but it is something you might want to address with your own model. The joins were pretty prominent here as well, so this assembly would need to be filled and sanded just like the cabin.
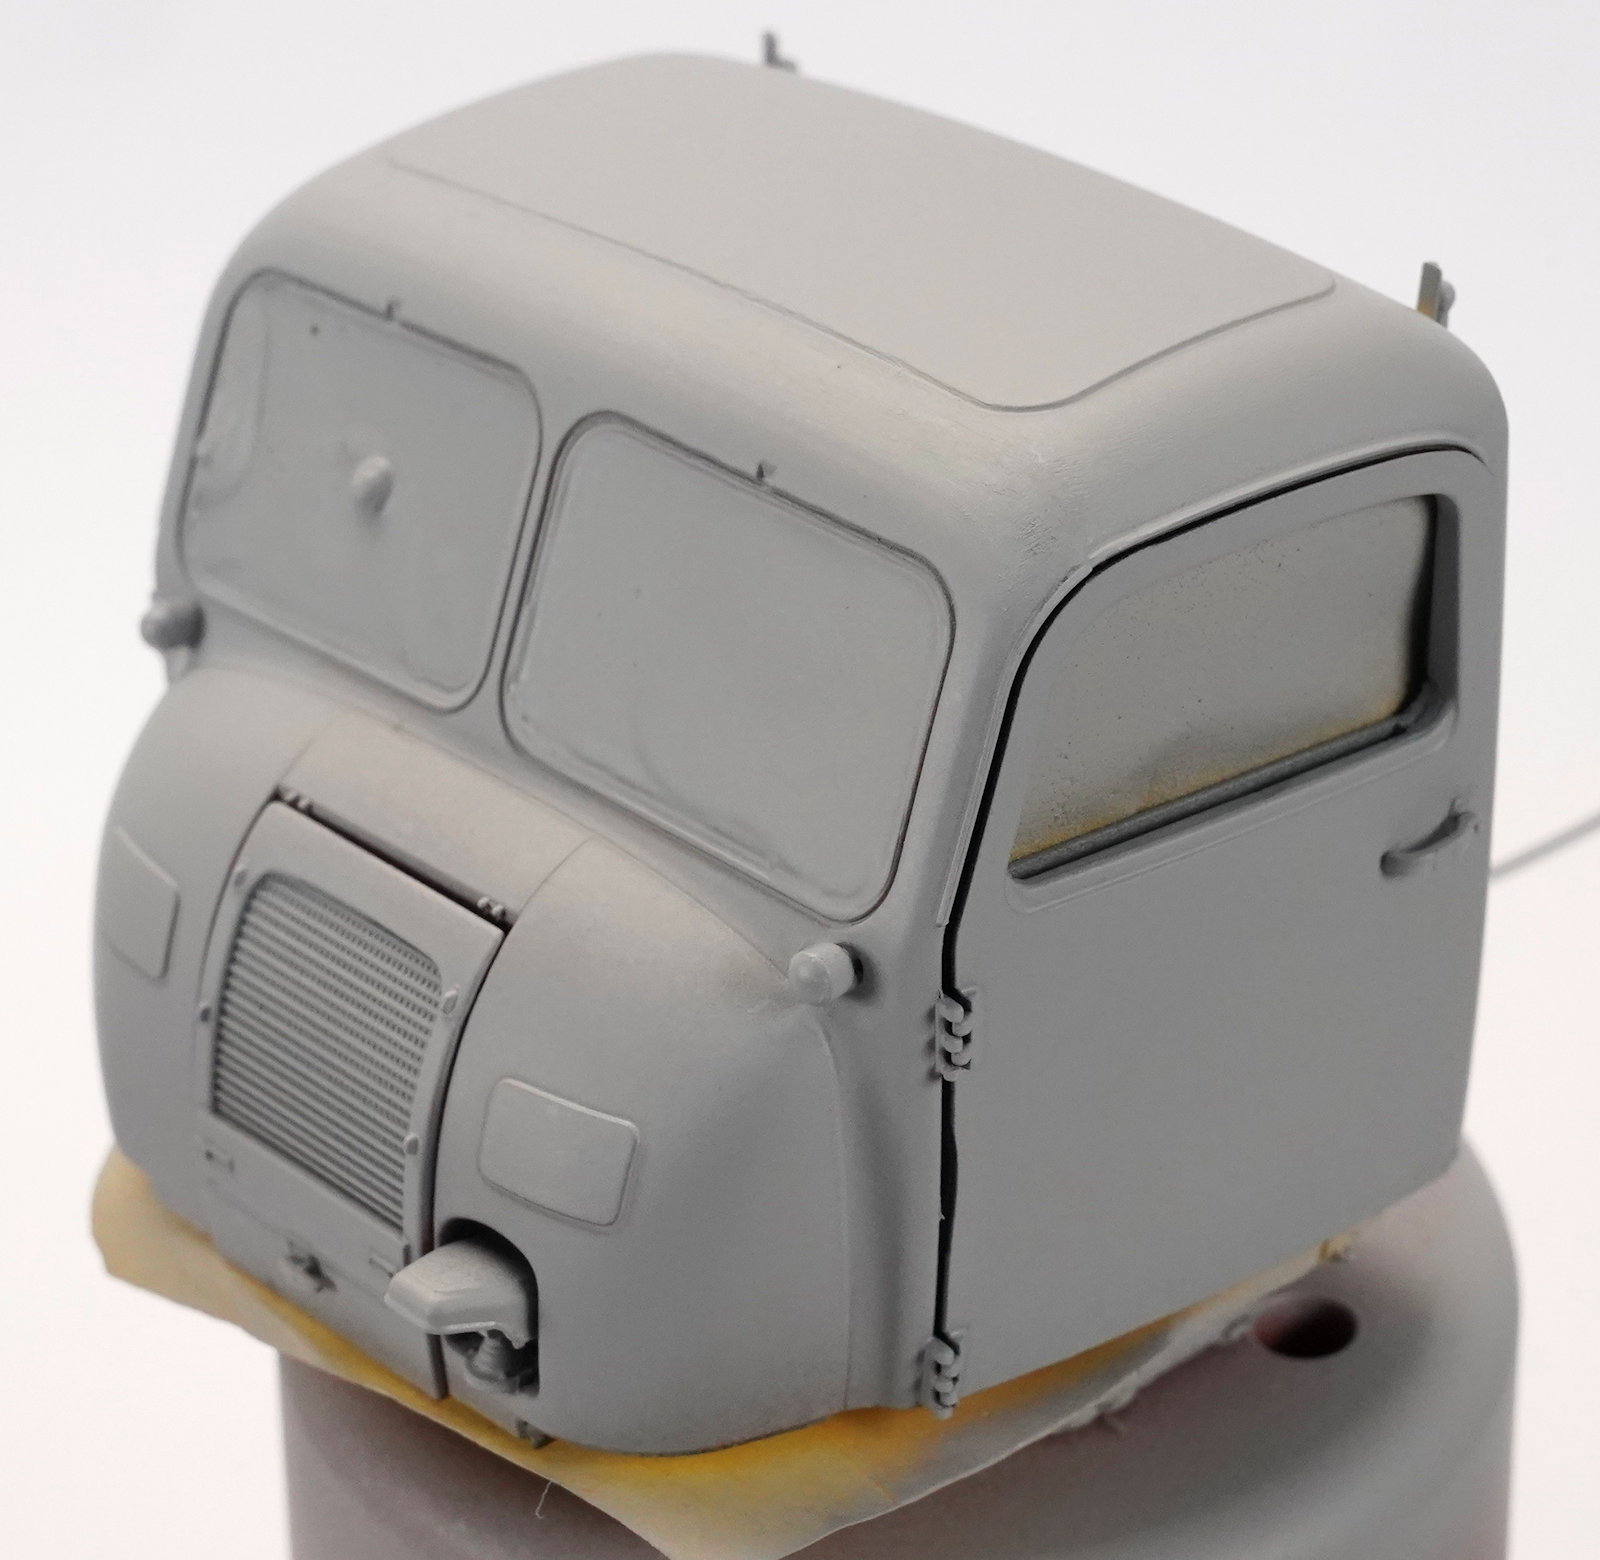
My primer stocks are running very low….so the canvas and the cabin were primed in a Mr Surfacer Grey. Applying the primer is always a rewarding stage, but it can also highlight the areas that may require some further attention.
The cabin and tray are now painted in the AK Real Colour - Dark Grey. I’m not bothering with my usual mottled style because of the camouflage I have planned for the next stage of the build will all but cover it anyway.
The cabin should, in theory just cap over the engine, but the fit is so tight and was feeling obscured by something. I tried to take it off to investigate but the engine assembly was wedged in so tight it came with it…not ideal.
Turned out it was this small part pipe like part causing the trouble, so I just removed it because you couldn’t see it anyway. Maybe I’d placed it incorrectly…I’m not sure, but once it was removed, I could get the cabin in place. Still overly tight but no longer obscured.
It was here I realised how deep in that front hatch the engine actually was, and those hours spent on it were pretty much a waste of time that I didn’t have. Obviously, that’s not a Miniart critique, it’s just an observation and something you might want to delete from your own model…or at least kept the effort invested in it to a minimum. Unless of course you pose it with the cabin off and that changes the equation dramatically.
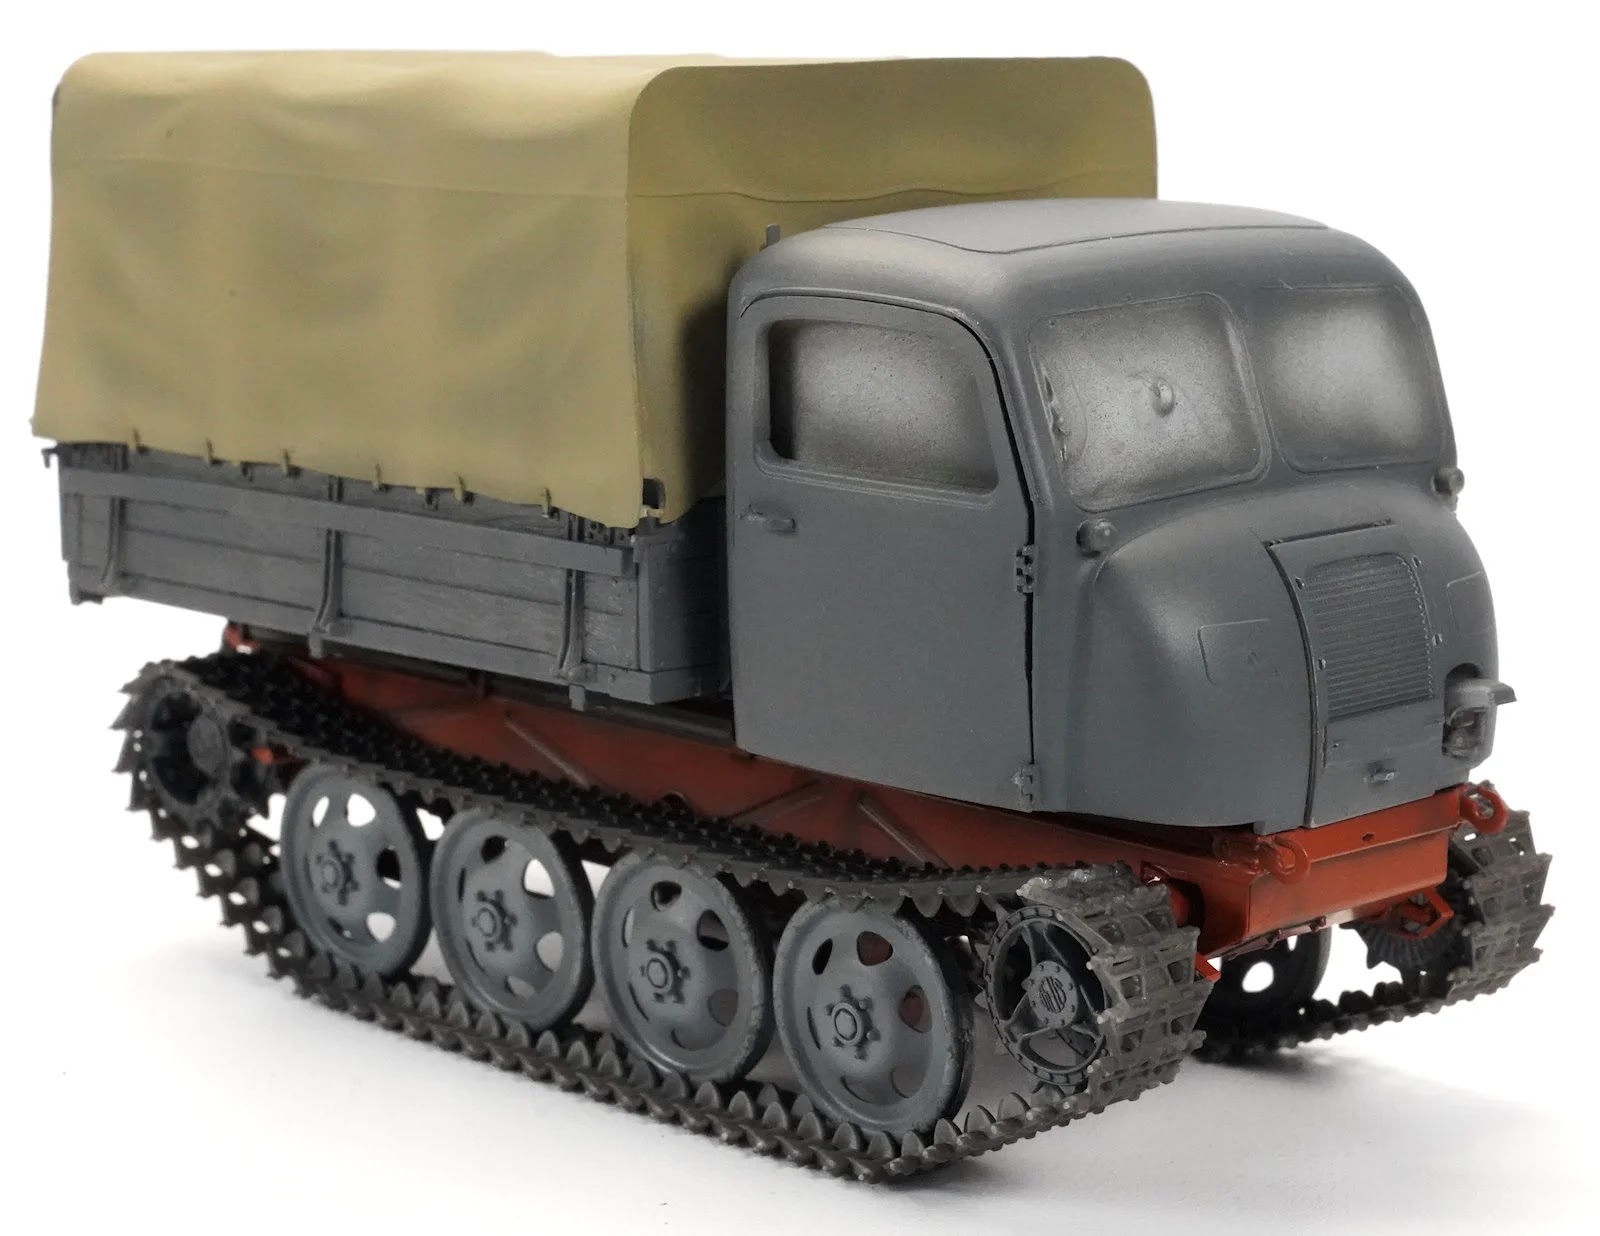
The tray was glued in place, and the only thing left to do at this stage was base coat the tarp.
I start the paintwork with some soft pre-shading around the recesses of the tarp. Creating realistic looking tarps and materials can be tricky, so I am going to try and enhance the folds and creases with these techniques.
The suggested colour is absent from the colour list, so I chose XF-49 Khaki as my deepest tone and applied a somewhat misted layer over the section. By keeping the paint thinned to around 70% thinner to paint and misting it on I am able to allow that shading to show through representing shadowed tones through the folds.
Adding Buff to the mix and then focussing the lightened colour on the high points of the folds and where the supports are implied underneath and can enhance the dimensional nature of the moulding.
CONCLUSION OK, so I can’t call this a finished model as such, but I think investing 17 hours in a Miniart kit over a weekend deserves some recognition, plus we raised some money for a great cause.
This kit was always going to be a popular release because a lot of people seem to have a soft spot for this little tractor, and with other versions set to be released it is going to be a case of choosing which one you want to build, or which one you can get your hands on!
The build for the most part was reasonably straight forward but may test a few modellers. This is not a kit for the beginner, and the intermediate modeller will need to be cautious around some of the assemblies, because it is easy to get caught out. A Miniart kit is a kit you really shouldn’t try to rush through, so I probably made life harder for myself because I tried.
The cons of the kit were some of the positioning of the parts were open to interpretation, and some of the connection points were overly tight and require a degree of pressure to get them to mate. The 3-piece assembly of the cabin seemed to be overcomplicated meaning the seams needed to be addressed. Missing colour call outs was annoying but not a deal breaker and the wire tubing you need to scratch build might be best left off the model.
The cons, well, as I mentioned the subject is awesome and very useable for those of you building German armour. I was impressed with some of the fine detail in the moulding like the welds on the wheel arms and the drive sprockets . The link and length tracks were just about perfect, and the cabin interior has a good level of refinement. The engine assembly is a model in itself and for those of you wanting to wire it up and pose the model with the cabin off there is a great opportunity to do that with this kit.
Overall, it is a really nice kit that required a degree of focus and patience, but there is no doubt it builds into a lovely rendition of the Early production Rauperschlepper.
Check out my video build of the kit for even more detail....
Clayton Ockerby
Thanks to MiniArt for sending this kit out so fast for me to build (almost as quickly) Check out the Miniart site for more info on all of their kits...
Please whitelist our site or turn off the ad blocker when visiting us. Ad revinue helps us continue to bring you the news. Refresh your page after you have done this to continue to the news. Thank you!!


.webp)
.webp)
.webp)
.webp)
.webp)
.webp)
.webp)
.webp)
.webp)
.webp)
.webp)
.webp)
.webp)
.webp)
.webp)
.webp)
.webp)
.webp)
.webp)
.jpg) The chassis section is the first part of the build as this will form the foundations of the vehicle. The instructions suggest fitting the cross sections first, but I found it was easier to fit the side walls first as that helped them bracing find their positions.
The chassis section is the first part of the build as this will form the foundations of the vehicle. The instructions suggest fitting the cross sections first, but I found it was easier to fit the side walls first as that helped them bracing find their positions..jpg)